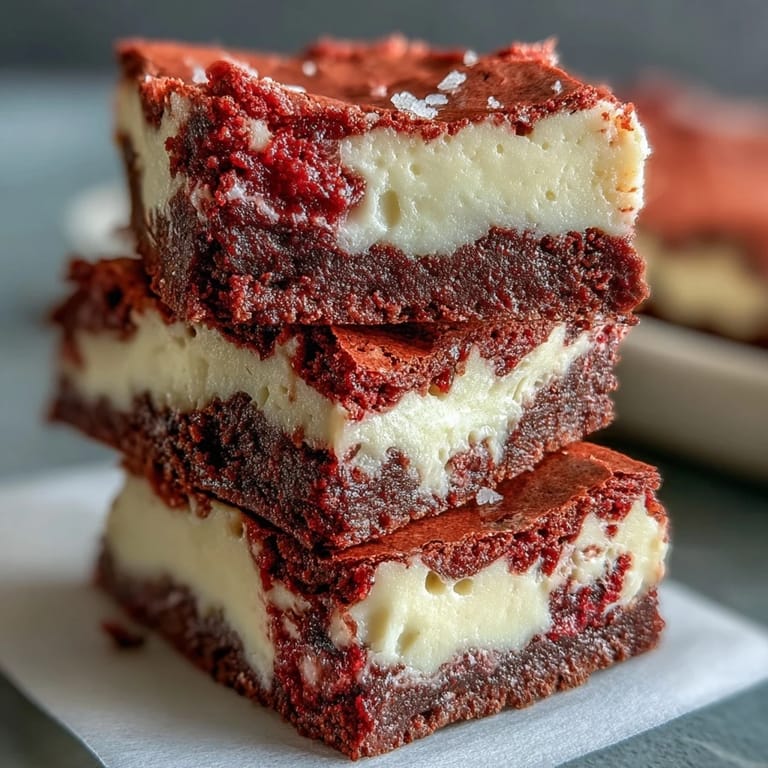
 Pin it
 Experience the ultimate dessert fusion with these red velvet cheesecake brownies. Each bite combines the deep, cocoa-infused richness of a fudgy red velvet base with a tangy, creamy cheesecake swirl. They are as visually stunning as they are delicious, making them the perfect centerpiece for any festive gathering or indulgent occasion.
Pin it Creating that iconic marbled look is simpler than it appears. By reserving a small amount of the red velvet batter and swirling it into the cheesecake layer, you create a beautiful pattern that makes every brownie unique. The vibrant red hue against the creamy white provides a striking contrast that is sure to stand out on any dessert platter.
Ingredients
Tired of Takeout? 🥡
Get 10 meals you can make faster than delivery arrives. Seriously.
One email. No spam. Unsubscribe anytime.
- Red Velvet Brownie Layer: 115 g (1/2 cup) unsalted butter, melted; 200 g (1 cup) granulated sugar; 2 large eggs, at room temperature; 1 tsp vanilla extract; 1 tbsp red food coloring (liquid or gel); 1/4 tsp salt; 60 g (1/2 cup) all-purpose flour; 20 g (2 tbsp) unsweetened cocoa powder
- Cheesecake Layer: 225 g (8 oz) cream cheese, softened; 50 g (1/4 cup) granulated sugar; 1 large egg; 1/2 tsp vanilla extract
Instructions
- Step 1
- Preheat your oven to 175°C (350°F). Line a 20x20 cm (8x8-inch) baking pan with parchment paper, leaving some overhang for easy removal.
- Step 2
- Prepare the red velvet brownie layer: In a large bowl, whisk together melted butter and sugar until smooth. Add eggs, vanilla extract, and red food coloring; mix until combined.
- Step 3
- Sift in the flour, cocoa powder, and salt. Fold gently until just combined—do not overmix.
- Step 4
- Reserve 1/4 cup of the red velvet batter for swirling. Spread the remaining batter evenly in the prepared pan.
- Step 5
- For the cheesecake layer: In a medium bowl, beat the cream cheese until smooth. Add sugar, egg, and vanilla; beat until creamy and lump-free.
- Step 6
- Pour the cheesecake mixture over the red velvet batter in the pan and spread evenly.
- Step 7
- Dollop reserved red velvet batter by spoonfuls over the cheesecake. Use a knife or skewer to create swirls.
- Step 8
- Bake for 35 minutes, or until the center is just set and a toothpick inserted comes out with a few moist crumbs.
- Step 9
- Cool completely in the pan on a wire rack. Refrigerate for at least 2 hours before cutting into squares.
Zusatztipps für die Zubereitung
To ensure the brownies stay fudgy, be careful not to overbake them. The center should be just set and slightly jiggle when you pull the pan out. Using a metal pan will often result in cleaner edges than a glass one.
Varianten und Anpassungen
For extra richness, you can add white chocolate chips to the brownie batter before baking. If you prefer a more natural coloring, you can substitute the food coloring with a small amount of beet powder, though the color may be more subtle.
Serviervorschläge
Serve these brownies chilled directly from the refrigerator for the best cheesecake texture. For an extra festive touch, finish each square with a light dusting of powdered sugar or a drizzle of melted chocolate.
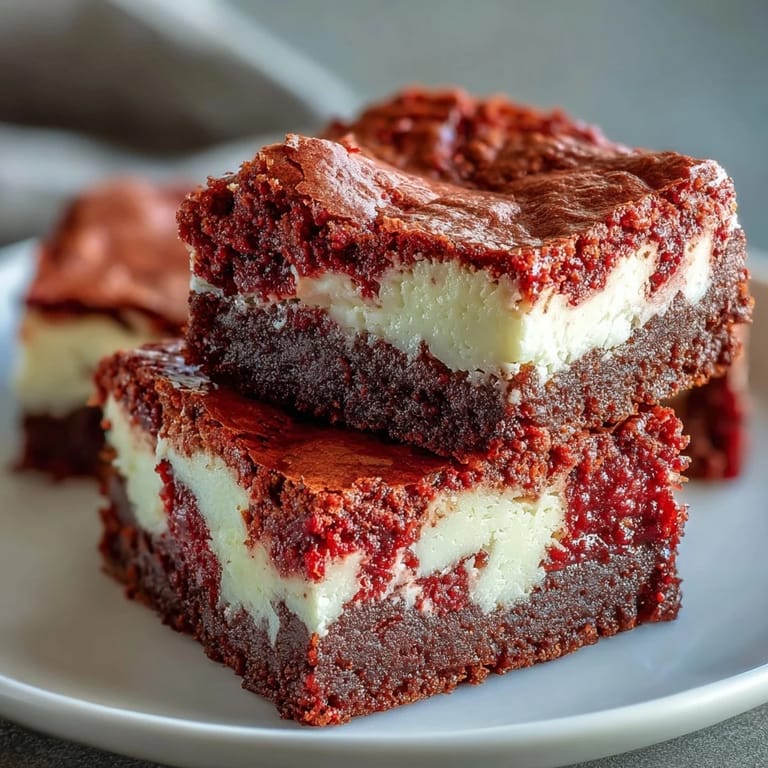 Pin it
 Once you try these decadent treats, they are sure to become a regular request in your household. Their unique combination of flavors and textures makes them a truly memorable dessert.
Recipe FAQ
- → Can I use natural food coloring instead of artificial dye?
Yes, you can use natural red food coloring, though the color may be less vibrant. Beet powder is a popular natural alternative, but you may need to adjust the quantity for desired color intensity.
- → How do I know when the brownies are done baking?
The center should be just set and slightly jiggly. Insert a toothpick into the brownie layer—it should come out with a few moist crumbs, not wet batter. Avoid overbaking to maintain fudgy texture.
- → Can I make these brownies ahead of time?
Absolutely! These brownies actually taste better after chilling. Make them up to 2 days in advance and store in the refrigerator. They'll keep fresh for up to 5 days in an airtight container.
- → What's the best way to get clean cuts?
Chill the brownies thoroughly for at least 2 hours. Use a sharp knife dipped in hot water and wiped clean between each cut. This ensures smooth, professional-looking squares.
- → Can I freeze these brownies for later?
Yes, these brownies freeze beautifully. Wrap individual squares in plastic wrap, then store in a freezer-safe container for up to 3 months. Thaw in the refrigerator overnight before serving.
- → Why is my cheesecake layer lumpy?
Lumps occur when cream cheese is too cold. Always bring cream cheese to room temperature before mixing, and beat it thoroughly until completely smooth before adding other ingredients.