Thai Basil Beef Rolls

Featured in: Plum-Soft Cozy Dinners

These vibrant fresh rolls combine savory ground beef seasoned with garlic, shallots, and aromatic Thai basil with crisp vegetables wrapped in soft rice paper. The beef filling cooks in a glossy sauce balancing salty, sweet, and spicy notes, while fresh herbs like mint, cilantro, and additional basil add bright layers. Each roll delivers satisfying crunch from cucumber, carrots, and lettuce, perfectly complemented by a tangy, spicy lime dipping sauce. Ready in about 55 minutes, they make an impressive light lunch or appetizer that's naturally dairy-free and easily adaptable for gluten-free needs.

Updated on Sun, 01 Feb 2026 11:42:00 GMT
Thai Basil Beef Rolls filled with savory ground beef, crisp vegetables, fresh herbs, and rice noodles, served with a spicy dipping sauce on the side. Pin it
Thai Basil Beef Rolls filled with savory ground beef, crisp vegetables, fresh herbs, and rice noodles, served with a spicy dipping sauce on the side. | plumclover.com

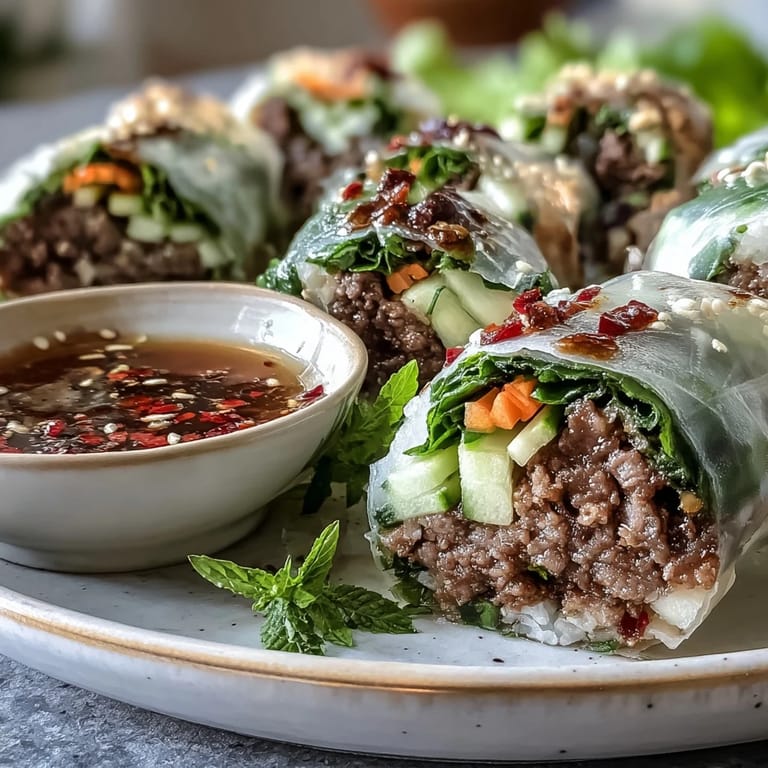
The first time I attempted rice paper rolls, I ended up with soggy tears of paper and filling everywhere. My kitchen counter looked like a salad explosion. But something about that vibrant, messy lunch stuck with me—the way the cool vegetables contrasted with that warm, fragrant beef, bright with basil and lime.

Last summer, my neighbor caught me rolling these on my back porch and ended up staying for dinner. We sat there dipping warm-weather rolls into that fiery-sweet sauce, eating with our hands, talking about everything and nothing until the sun went down.

Ingredients

  • Ground beef: 85-90% lean gives you enough fat to keep the filling juicy without rendering down too much during cooking
  • Thai basil: Its distinct anise-like peppery flavor is non-negotiable here—regular basil simply does not deliver the same aromatic punch
  • Rice paper wrappers: Large ones (8.5 inches) give you more room to work with and are much more forgiving for beginners
  • Fresh vegetables: Keep them julienned uniformly so each roll has the same satisfying crunch in every bite

Instructions

Product image
Quickly chop vegetables, mince herbs, and blend sauces for faster, everyday meal preparation.
Check price on Amazon
Mix the sauce seasoning:
Combine all the sauce ingredients in a small bowl, stirring until the sugar dissolves completely into a glossy, pourable mixture
Build your flavor base:
Heat oil in a large skillet over medium-high heat, then add garlic and shallot, stir-frying until fragrant and just beginning to turn golden
Add heat and aromatics:
Toss in the minced chilies and white parts of the green onions, cooking briefly until their spicy scent fills the air
Brown the beef:
Add the ground beef, breaking it apart with your spatula, and cook until browned with some crispy edges forming
Introduce sweetness and crunch:
Stir in the diced red bell pepper and let it soften slightly while absorbing those rendered beef juices
Coat with the seasoning sauce:
Pour in your prepared sauce mixture, tossing everything together until the beef glistens and the sauce reduces slightly
Finish with fresh herbs:
Reduce heat to low, add the chopped Thai basil and green onion tops, and toss just until the basil wilts and releases its fragrance
Cool completely:
Turn off the heat, stir in the lime juice, and let the beef mixture cool to room temperature—warm filling makes rice paper tear
Prep your rolling station:
Cook and cool your rice or noodles, slice all your vegetables into uniform strips, and arrange herbs in separate bowls
Whisk the dipping sauce:
Combine fish sauce, lime juice, sugar, water, garlic, chilies, and optional garnishes, tasting to balance salty, sour, sweet, and spicy
Soften the rice paper:
Dip each wrapper one at a time into warm water for 3-5 seconds, rotating to moisten evenly, then place on your work surface
Layer your fillings:
Place rice or noodles on the bottom third, top with beef, then arrange vegetables and herbs in a neat, compact row
Roll like a pro:
Fold the bottom edge over the filling, fold in the sides, then roll tightly away from you, keeping gentle pressure to create a firm cylinder
Finish and serve:
Place each finished roll seam-side down and serve whole or sliced diagonally with that spicy dipping sauce on the side
Product image
Quickly chop vegetables, mince herbs, and blend sauces for faster, everyday meal preparation.
Check price on Amazon
Close-up of fresh Thai Basil Beef Rolls with shredded carrots, cucumber, and cilantro, showcasing soft rice paper wrappers and a tangy lime-fish sauce dip. Pin it
Close-up of fresh Thai Basil Beef Rolls with shredded carrots, cucumber, and cilantro, showcasing soft rice paper wrappers and a tangy lime-fish sauce dip. | plumclover.com

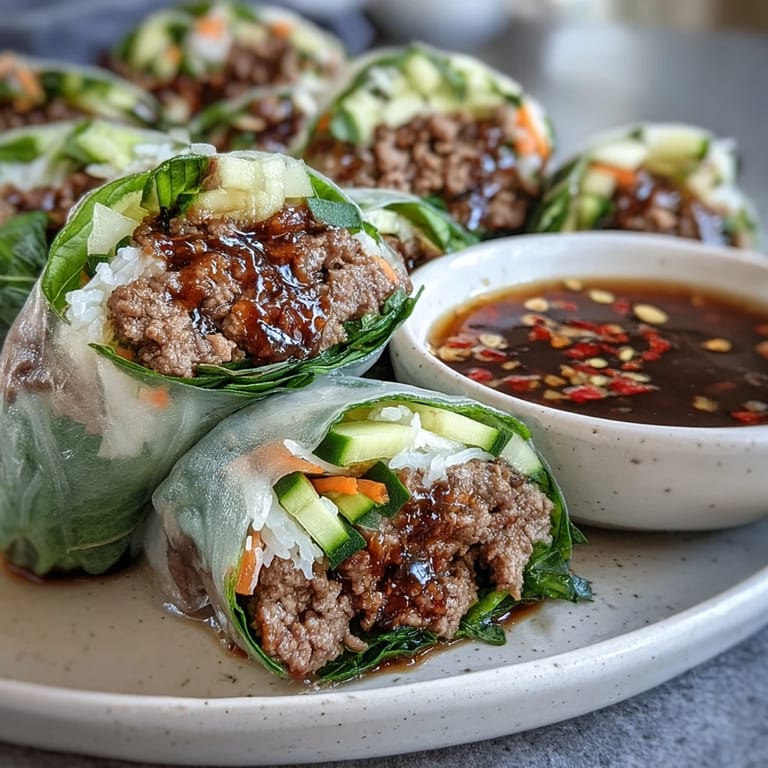
These rolls have become my go-to for summer potlucks because they travel beautifully and always disappear first. Something about eating with your hands makes people relax and linger around the platter.

Make Ahead Magic

The beef filling keeps beautifully in the refrigerator for up to three days, actually developing deeper flavor as it rests. You can prep all your vegetables and make the dipping sauce the night before, keeping everything in separate containers.

Rolling Station Setup

Clear your biggest work surface and arrange everything in assembly-line order: wrappers, then rice, then beef, then vegetables, then herbs. Having a damp towel nearby to wipe your hands keeps things tidy and prevents sticky fingers from transferring to the rice paper.

Customize Your Crunch

Sometimes I swap in sliced radishes or shredded red cabbage for extra color and bite. Thinly sliced mango adds surprising sweetness that balances the savory beef beautifully.

  • Toast some crushed peanuts and sprinkle them inside for extra protein and texture
  • Add a few cilantro stems—they pack more flavor than the leaves and stay crunchy
  • A splash of rice vinegar in the dipping sauce brightens everything
Product image
Juice whole fruits and vegetables easily for fresh drinks, sauces, and nutrient-rich recipes.
Check price on Amazon
Overhead view of sliced Thai Basil Beef Rolls arranged on a platter with extra herbs and limes, perfect for a light lunch or appetizer. Pin it
Overhead view of sliced Thai Basil Beef Rolls arranged on a platter with extra herbs and limes, perfect for a light lunch or appetizer. | plumclover.com

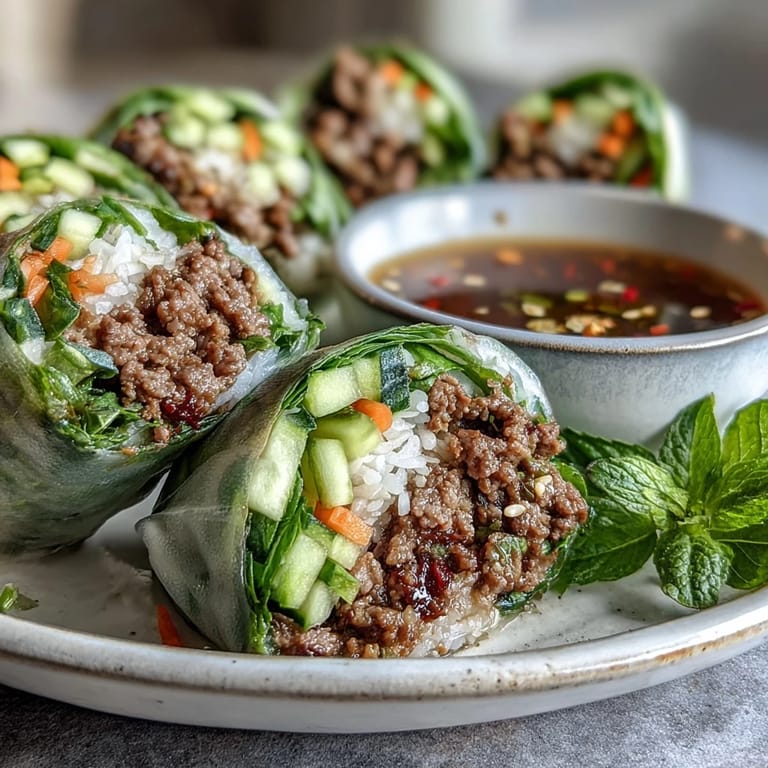
There is something profoundly satisfying about food you eat with your hands, especially when each bite contains layers of texture and flavor. These rolls turn lunch into an experience worth lingering over.

Recipe FAQ

How do I prevent rice paper from tearing when rolling?

Use warm (not hot) water and dip wrappers for just 3-5 seconds. The paper continues softening as you work. Don't oversoak—slightly stiff wrappers are easier to handle than overly soft ones. A lightly oiled board also prevents sticking.

Can I make these ahead of time?

Rolls are best served fresh within 2-3 hours. If storing, cover with a damp towel and plastic wrap, refrigerate, then let sit at room temperature 10-15 minutes before serving. The beef filling can be made a day ahead and kept refrigerated.

What can I substitute for Thai basil?

Italian basil combined with fresh mint makes a good substitute. Thai basil has distinct peppery anise notes, so the combination helps approximate the flavor profile. Use slightly more Italian basil to compensate for milder flavor.

How do I make these gluten-free?

Use gluten-free soy sauce or tamari, gluten-free oyster sauce, and verify all condiment labels. Most rice paper wrappers are naturally gluten-free, but always check packaging. The same applies to fish sauce—most brands are GF.

Can I use other proteins besides beef?

Ground turkey, chicken, or pork work well with the same seasoning. For lighter options, choose extra-lean beef or turkey. Cooking times may vary slightly—poultry should reach 165°F internally. Plant-based ground meat alternatives also work.

Thai Basil Beef Rolls

Fresh rice paper rolls with savory beef, Thai basil, and crisp vegetables in a tangy dipping sauce.

Time to Prepare
30 minutes
Time to Cook
15 minutes
Overall Time
45 minutes
Recipe by Joshua Barnes


Skill Level Medium

Cuisine Type Thai

Portions 4 Serving Size

Dietary notes No Dairy

What You Need

Beef Filling

01 1 pound ground beef, 85-90% lean
02 1 tablespoon neutral oil
03 3 cloves garlic, minced
04 1 small shallot, finely minced
05 2 Thai bird's eye chilies, finely minced
06 1 small red bell pepper, finely diced
07 3 green onions, thinly sliced
08 1 cup fresh Thai basil leaves, roughly chopped
09 1 tablespoon fresh lime juice

Sauce Seasoning

01 1.5 tablespoons soy sauce
02 1 tablespoon fish sauce
03 0.5 tablespoon oyster sauce
04 1 teaspoon dark soy sauce
05 2-3 teaspoons brown sugar
06 1-2 tablespoons water

Rice Paper Rolls

01 12-16 large rice paper wrappers
02 1.5 cups cooked jasmine rice or rice vermicelli noodles, cooled
03 1 cup shredded lettuce
04 1 cup julienned cucumber
05 1 cup julienned carrots
06 1 cup fresh cilantro leaves
07 1 cup additional Thai basil leaves
08 1 cup fresh mint leaves
09 Warm water for softening rice paper

Dipping Sauce

01 3 tablespoons fish sauce
02 3 tablespoons fresh lime juice
03 2.5 tablespoons warm water
04 1.5 tablespoons sugar
05 1 clove garlic, finely minced
06 1-2 Thai bird's eye chilies, thinly sliced
07 1 tablespoon finely shredded carrot
08 1 teaspoon finely chopped cilantro stems

How-To Steps

Step 01

Prepare Sauce Seasoning: In a small bowl, combine soy sauce, fish sauce, oyster sauce, dark soy sauce, and brown sugar. Stir until sugar dissolves completely. Add water gradually to achieve a glossy, pourable consistency. Set aside.

Step 02

Sear Aromatics: Heat 1 tablespoon neutral oil in a large skillet over medium-high heat. Add minced garlic and shallot, stirring constantly for 30-45 seconds until fragrant and lightly golden.

Step 03

Bloom Spices and Onions: Add minced chilies and white parts of green onions to the skillet. Stir-fry for 20-30 seconds until the mixture becomes aromatic.

Step 04

Brown Ground Beef: Add ground beef to the skillet, breaking it apart with a spatula. Cook for 4-6 minutes while stirring frequently until the meat is mostly cooked through with light browning.

Step 05

Add Bell Pepper: Stir in diced red bell pepper and cook for 2-3 minutes until the pepper begins to soften.

Step 06

Coat with Sauce: Pour the prepared sauce seasoning over the beef mixture. Toss thoroughly to coat all meat pieces and cook for 2-3 minutes more, allowing the sauce to reduce and cling to the beef. Taste and adjust seasoning as needed.

Step 07

Finish with Basil: Reduce heat to low. Add chopped Thai basil and the green parts of the green onions, tossing gently for 30-45 seconds until the basil just begins to wilt.

Step 08

Cool Beef Filling: Turn off heat and stir in fresh lime juice. Transfer the beef mixture to a plate and allow it to cool completely to room temperature.

Step 09

Prepare Components: While the beef cools, cook jasmine rice or noodles if using and cool completely. Prepare all vegetables and fresh herbs, arranging them in separate bowls for easy assembly during rolling.

Step 10

Make Dipping Sauce: In a bowl, whisk together fish sauce, lime juice, warm water, and sugar until sugar dissolves. Add minced garlic, sliced chilies, shredded carrot, and cilantro. Taste and adjust seasonings to balance salty, sour, sweet, and spicy notes. Refrigerate if desired.

Step 11

Set Up Rolling Station: Fill a large shallow dish with warm water. Prepare a clean board or plate, lightly oiling the surface if the rice paper tends to stick.

Step 12

Soften Rice Paper: Working with one wrapper at a time, submerge it in the warm water for 3-5 seconds, rotating gently to ensure even moistening. Place the softened wrapper on the prepared board where it will continue to soften.

Step 13

Assemble Filling: On the bottom third of the wrapper, layer 2-3 tablespoons cooled rice or noodles, followed by 2-3 tablespoons beef mixture, cucumber strips, carrot strips, lettuce, cilantro, basil, and mint leaves.

Step 14

Roll Tightly: Fold the bottom edge of the wrapper over the filling. Fold in both sides, then roll away from you tightly to form a neat cylinder with the seam on the bottom.

Step 15

Finish Rolls: Place each completed roll seam-side down on a serving plate. Repeat the rolling process with remaining wrappers and filling until all rolls are assembled.

Step 16

Rest and Serve: Serve rolls immediately while fresh, either whole or sliced diagonally. If storing is necessary, cover with a damp towel and plastic wrap, refrigerating for up to 2-3 hours. Allow rolls to sit at room temperature for 10-15 minutes before serving for optimal texture and flavor.

Needed Tools

  • Large skillet or wok
  • Mixing bowls
  • Sharp knife and cutting board
  • Shallow dish or pan for water
  • Clean board or large plate for rolling
  • Tongs or chopsticks

Possible Allergens

Review each item for allergens and get advice from your medical provider if you’re unsure.
  • Contains fish from fish sauce
  • Contains soy from soy sauce and oyster sauce
  • May contain shellfish from oyster sauce depending on brand
  • Contains wheat unless using gluten-free sauces

Nutritional details (per serving)

For informational use only. Not a substitute for health advice.
  • Energy (kcal): 125
  • Fat content: 5 g
  • Carbohydrates: 12 g
  • Proteins: 8 g